This post will hopefully give an overview of the various entities which might need to authenticate to Azure, where this authentication can happen, and what resources/setup might be required to make it happen.
These are the objects in scope for this post:
graph BT
  Azure["☁️ Azure"]
  User["👤 Users
Entra ID"]
  App["🧩 Applications
.Net code"]
  Pipe["🚀 Pipelines
Azure DevOps
GitHub Actions"]
  Res["⚙️ Resources
Azure"]

  User --> Azure
  App --> Azure
  Pipe --> Azure
  Res --> Azure
Before we dive straight into these objects though I’ll start by introducing some of the fundamental pieces which allow all of this to work.
Fundamentals#
Who you are | What you can do#
Before we crack on I want to clarify about authentication and authorisation. If you’ve ever logged into a service (successfully or not) such as social media or your company’s internal business applications, you have partaken in authentication - also known as AuthN. This is where some kind of identity provider validates you are who you say you are.
AuthN is only one part of the picture though - once logged in you’ll likely want to perform some actions such as upload images or update some client details. The ability to perform these actions is part of authorisation, also known as AuthZ.
Just because you logged into a service successfully, it doesn’t mean you can do things like delete other people’s posts, or access protected areas of your business applications which might be reserved for certain departments.
Authentication - who are you, and authorisation - what can you do, are two essential (and separate) pieces to keeping most modern tech systems safe. This is relevant across all the identities we’ll review because successfully authenticating with an identity doesn’t mean it’s been authorised to take action; we’ll need to pair this with some kind of authorisation, such as Azure Role Based Access Control (RBAC) assignments.
Service principals#
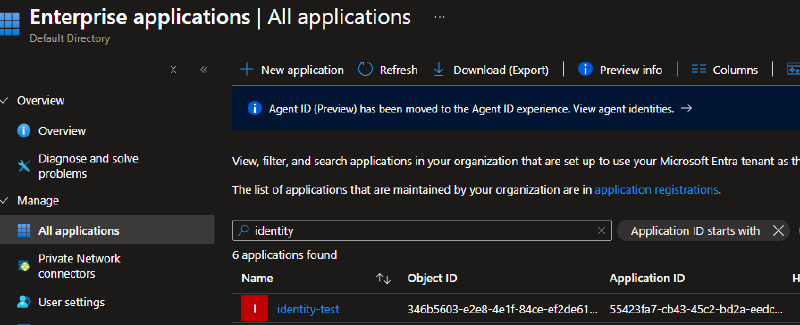
Service principals are objects within Entra ID which can support human and non-human authentication, kind of like a service account. I don’t want to launch into a whole in-depth side quest, so for more details and a far better explanation than I could do check out Azure AD App Registrations, Enterprise Apps and Service Principals by John Savill which, although a few years old, still holds up really well. Service principals can be seen within the Azure portal under the Enterprise applications blade - here’s an example:
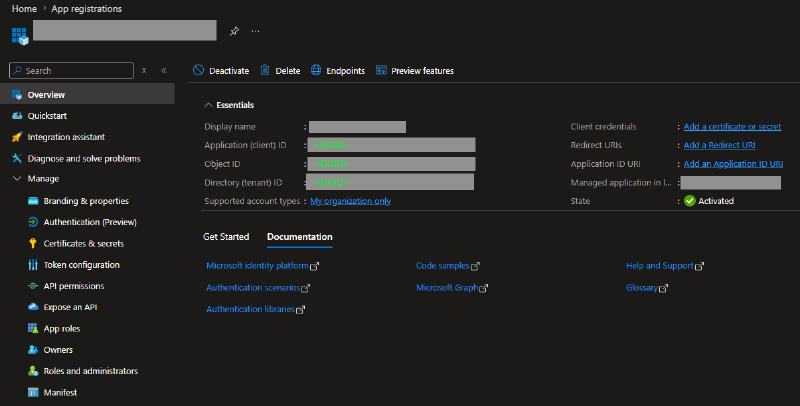
and the ‘application object’ is under the App registrations blade:
Don’t get me started on the terminology around these, I have to review the docs every time I try to explain it.
Service principals require some kind of credential setup, they can use secrets (aka password), certificates, or to be rid of passwords forever, a federated credential which leverages workload identity federation. This type of authentication is preferred over secrets as it will dynamically issue short-lived access tokens as required.
These can all be configured in this certificates & secrets section:

Managed identities#
Managed identities are a type of service principal but they’re unique enough to call out as their own thing. They’re super useful because essentially they can bestow an identity upon an Azure resource; we’ll see how that looks when we review resources in more detail later.
Many Azure services and resource types support managed identity - I just want to highlight how excellent this is because if you didn’t catch it:
Managed identities perform secretless authentication!
Who doesn’t want less passwords in their life?! Anyway, managed identities come in two flavours - user-assigned managed identities (UMI) and system-assigned managed identities (SMI). Both have a similar function, but depending on what you need to achieve one might be better suited than the other. The summary is SMIs are tied to the lifecycle of the resource (such as a virtual machine) and deleting the virtual machine means the identity will also be deleted. In contrast, UMIs are an actual Azure resource which can be attached to any resource which supports it, separating the lifecycle of the resource and the identity.
There’s plenty of guidance from Microsoft about when you might choose one over the other but best practice doesn’t mean blind capitulation - do your research on the scenario and then pick a way forward.
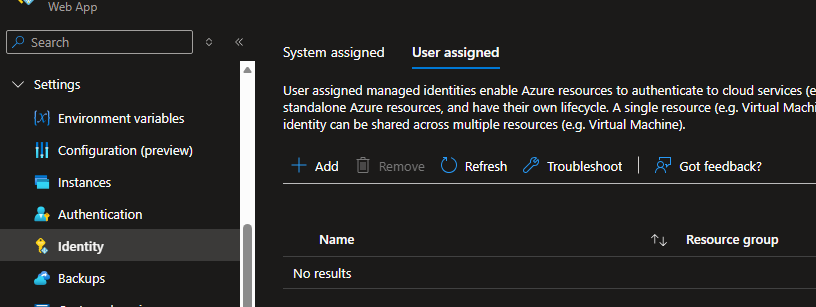
Here’s some examples within the Azure portal showing where the identity settings usually are. Most supported resources have an Identity setting in the left-hand menu, the exact location and wording can vary resource by resource so explore until you find it.
System identity
Before enabled: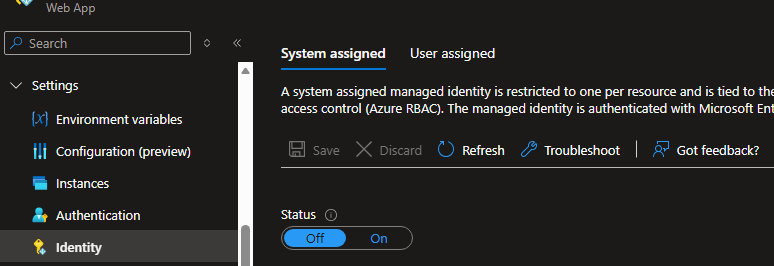
After enabled:

User identity
Before any user identities have been attached to the resource:
After attaching one:
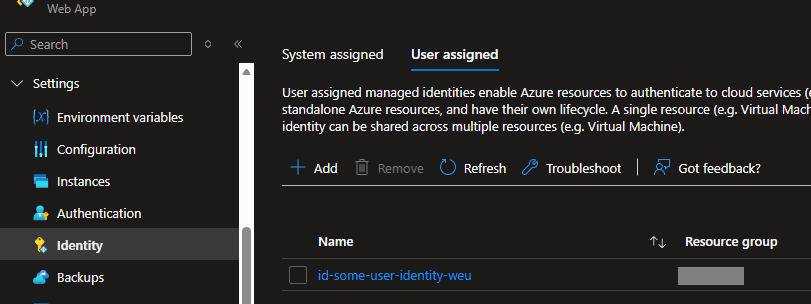
Enabling or creating identities will register them into the Entra directory as a Service Principal. You can see these if you go searching within the Enterprise applications section of the Azure portal.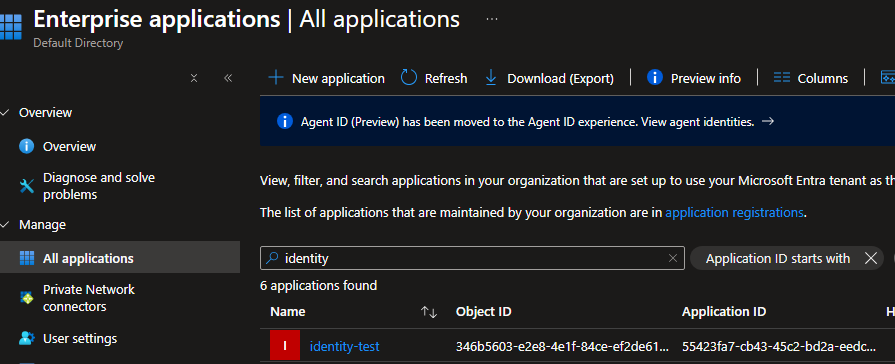
Some additional points about UMIs:
- Attaching an identity to a resource requires certain permissions; write, over the resource, and
Microsoft.ManagedIdentity/userAssignedIdentities/*/assign/actionover the user-assigned identity. - User-assigned managed identities cannot be moved across a resource group or subscription boundary.
- Enabling Isolation Scope can restrict the use of a user-assigned identity to a specific region.
An identity story#
Some time ago I had to migrate some Web Apps configured with SMI to Azure Container Apps. With system identities, this meant all the role assignments had to be re-provisioned (duplicated for the duration of the migration). If user-assigned identities had been used I could have attached the same identity to the new container apps and presto, they gain all the same permissions.
There’s a similar argument to be made for Azure Container Apps -> Azure Kubernetes Service migrations - with an existing user-assigned identity that is already authorised with all the permissions your application needs it may make migrations a little easier.
The way I see it, the lifecycle of a business application isn’t necessarily tied to its resource type as the underlying compute might change for various reasons. If your compute changes are always tied to moving to new resource groups or subscriptions then the UMI becomes a little less attractive.
Users#
Whether you’re testing some Terraform or developing an application, working locally within a Microsoft/Azure ecosystem will likely require access to some Azure resources at some point. What’s the identity you’re using when you connect? The simplest answer is probably your Entra login; the one you use to access your laptop, sign into business applications etc.
It’s pretty easy to authenticate as a user from your local machine and there are a number of tools you can use to achieve this; at the end of the day all the requests are going to the Azure Resource Manager so which tool you use is up to you (or your internal policies). Whether you’re browsing the Azure portal, connecting via Azure CLI with az login, PowerShell with Connect-AzAccount, or signed in through VS Code/Visual Studio…
all roads lead to ARM!
As long as someone or something has provisioned it, users can also authenticate using a service principal. The secret can either be a password or certificate. Don’t forget this is only the authentication piece, if the service principal hasn’t been granted any permissions they won’t be able to do much.
Here are the az cli examples - any of the tools mentioned above should have their own implementation for this:
az login --service-principal --username APP_ID --password CLIENT_SECRET --tenant TENANT_ID
az login --service-principal --username APP_ID --certificate /path/to/cert.pem --tenant TENANT_IDUser accounts shouldn’t be tied to any production resources or processes - if they’re deactivated/locked out then anything relying on it will likely cease to function.
Resources#
If you’re deploying resources to Azure it’s highly likely some of them are going to need to interact with each other. Although some resources can be accessed using Shared Access Keys (essentially a password), where possible it’s recommended to leverage managed identities instead.
The process for assigning managed identities is similar across the board, here’s a ClickOps example of enabling an SMI on a web app and granting the identity access to a storage account:
Step 1 - Enable managed identity
Step 2 - Assign access to storage

Remember our AuthN and AuthZ - the first demo shows the identity being enabled so when the web app attempts to talk to the managed identity infrastructure it can authenticate with a successful result. The second demo shows creating the Azure RBAC assignment with authorises the web app to access the storage account.
Some examples of resource-to-resource access might be:
- Application gateway -> key vault to access certificates required for connecting securely to, as an example,
https://your-app.company.com - Web app/container app -> app config or database
- Virtual machine (VM) -> storage account
Some organisations might have policies that prevent logging in with your Entra account on any device which isn’t your primary computer/laptop - if this is the case using az login or Connect-AzAccount wouldn’t work from within the virtual machine.
Regarding VMs, deploying a new virtual machine won’t do anything by default, identities only come into play when you want to run an application or script within the VM. Let’s imagine you’ve created a new VM and enabled its system-assigned managed identity; after you log into it what kind of identities/auth methods can you use?
Assuming Azure CLI or PowerShell were installed, similar to your local machine you could login with:
- your Entra user account (using
az loginorConnect-AzAccount) - a service principal (using
az login --service-principal --username APP_ID --password CLIENT_SECRET --tenant TENANT_ID)
or an additional option - managed identity! This can be done using
az login --identityorConnect-AzAccount -Identity
Successfully authenticating like this means you have obtained an access token for the virtual machine identity, not your user account. It should now be possible to upload a file from the local file system of the virtual machine into a storage account using az storage blob upload as long as the VM identity has been granted Storage Blob Data Contributor over the storage account.
It’s important to note that when a VM tries to get an access token it’s calling a special endpoint called the Azure Instance Metadata Service (IMDS). Different resources might call different endpoints, but the common theme is these endpoints are only viable for resources which support managed identity running within the Azure ecosystem - managed identities cannot be used locally.
Additionally, if you’ve attached a user-assigned managed identity to the virtual machine you can authenticate with it instead, using the following similar commands:
az login --identity --client-id CLIENT_IDorConnect-AzAccount -Identity -AccountId CLIENT_ID
with CLIENT_ID being the Client ID of the UMI.
Applications#
A long time ago in a galaxy far far away we used to run applications on physical hardware which were stored in the office, or we’d send our servers to a shared data centre down the road to stop worrying about the power and cooling requirements that comes with hosting your own hardware. The point is, applications always have and always will need to run on some kind of compute (that is CPU, RAM, disk, network etc), and that hasn’t changed simply because things are ‘in the cloud’ now; the cloud is just someone else’s computer.
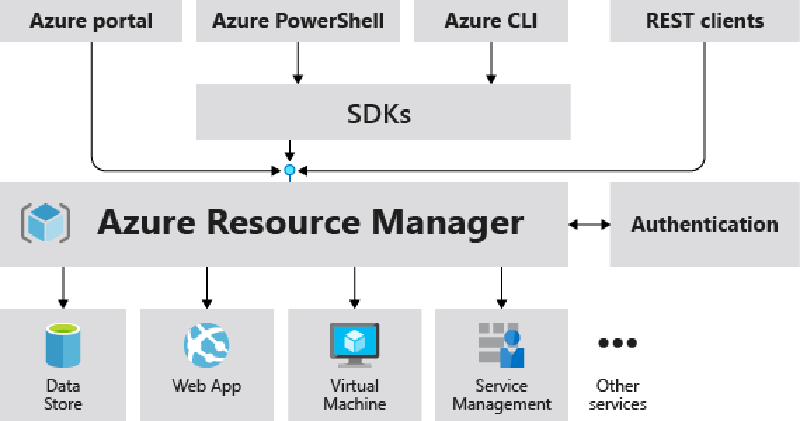
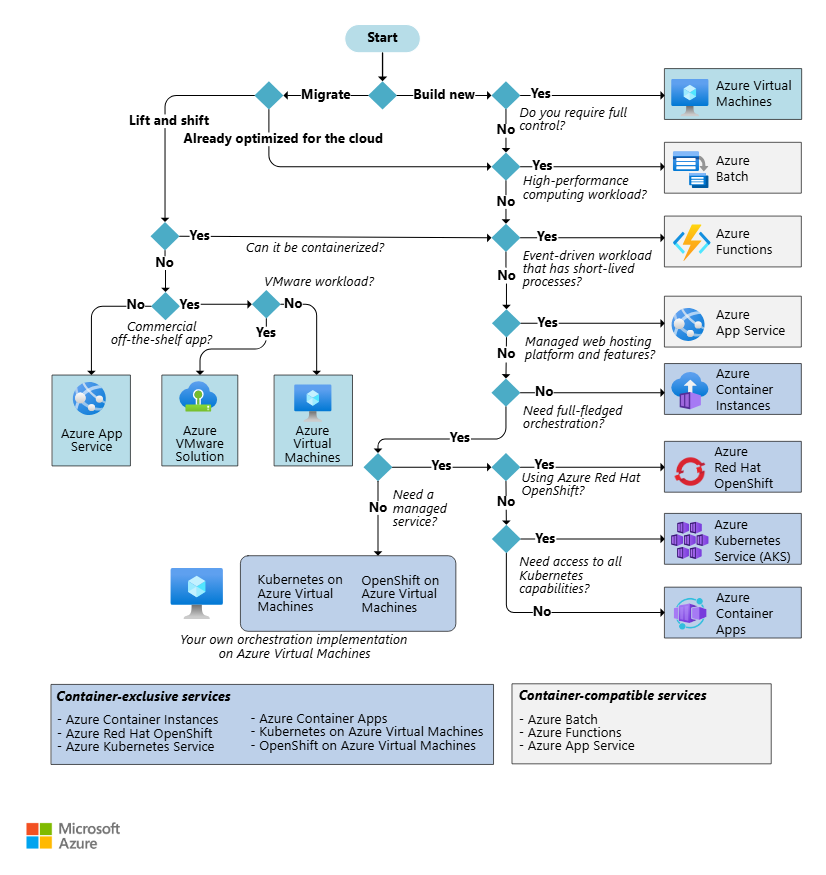
When an application is built and published (usually as a container these days) to Azure we can choose what kind of compute will power them as per the Microsoft flowchart below - lots of options and as far as I know, all support using managed identities.
Azure compute choices
Let’s assume we’ve decided to use Azure Container Apps to run our applications. Most applications will have some kind of dependency such as writing data to a storage account, connecting to a database, or loading in secrets from a key vault. As we’ve learned in the resources section you can enable managed identity pretty easily, but how does your application know how to use it? And how does it know when to use a service principal, managed identity, or other form of authentication?
The answer is we have to tell it! For .Net, the Azure.Identity library has a bunch of good stuff to help your application get authenticated and access the dependencies it needs. This library/package can be imported into your application and if you’re not using .Net, most major languages have a similar library.
The library has many different TokenCredential types which inform the authentication method with the two most interesting ones to me being DefaultAzureCredential and ChainedTokenCredential.
The first is a predefined list of credentials to attempt, whilst the second is a custom list you can create to specify just the ones appropriate for your use case. These chained credentials will try one TokenCredential type after the other, and here’s the provider list for DefaultAzureCredential:
DefaultAzureCredential precedence
| Order | Credential | Description |
|---|---|---|
| 1 | Environment | Reads environment variables to determine if an application service principal is configured for the app. If so, uses these values to authenticate the app to Azure. Most often used in server environments but can also be used when developing locally. |
| 2 | Workload Identity | If the app is deployed to an Azure host with Workload Identity enabled, authenticate that account. |
| 3 | Managed Identity | If the app is deployed to an Azure host with Managed Identity enabled, authenticate the app to Azure using that Managed Identity. |
| 4 | Visual Studio | If the developer authenticated to Azure by logging into Visual Studio, authenticate the app to Azure using that same account. |
| 5 | Visual Studio Code | If the developer authenticated via Visual Studio Code’s Azure Resources extension and the Azure.Identity.Broker package is installed, authenticate that account. |
| 6 | Azure CLI | If the developer authenticated to Azure using Azure CLI’s az login command, authenticate the app to Azure using that same account. |
| 7 | Azure PowerShell | If the developer authenticated to Azure using Azure PowerShell’s Connect-AzAccount cmdlet, authenticate the app to Azure using that same account. |
| 8 | Azure Developer CLI | If the developer authenticated to Azure using Azure Developer CLI’s azd auth login command, authenticate with that account. |
| 9 | Interactive browser | If enabled, interactively authenticate the developer via the current system’s default browser. |
| 10 | Broker | Authenticates using the default account logged into the OS via a broker. Requires that the Azure.Identity.Broker package is installed. |
This link also breaks down which ones to use in different situations.
An application that has been configured to use AzureDefaultCredential will go through this list in order and try to obtain a token. This includes a number of credential types, so sometimes people make a ChainedTokenCredential which specifically includes just the ones they want.
I want to specifically call out the behaviour of how chained credentials work:
At runtime, a credential chain attempts to authenticate using the sequence’s first credential. If that credential fails to acquire an access token, the next credential in the sequence is attempted, and so on, until an access token is successfully obtained.
Let’s tuck this little fact away for now and switch back to the container app. So far you’ve:
- written some code, used the Azure.Identity library, and chosen the
AzureDefaultCredentialtoken credential class - built and published your application as a container image to a container registry
- deployed an Azure Container App specifying your application image
Assuming everything goes well the application should start up and attempt to request a token using the first credential in the list: environment variables. The application will check if it can see AZURE_CLIENT_ID, AZURE_TENANT_ID, AZURE_CLIENT_SECRET environment variables and if not, move on. Given we didn’t configure these, it will progress on to workload identity which will also be a negative as this is for use within Azure Kubernetes Service (AKS). Next up, it will try managed identity and as long as we enabled SMI or UMI on the resource this should be successful!
The application now has an access token it can use to connect to dependencies within Azure such as storage, key vault, database etc. Keep in mind successfully obtaining a token doesn’t mean it can do much with it - the identity must be granted permissions (aka authorisation!) such as Storage Blob Data Contributor on the storage resources, or db_datawriter on the database so the application can perform its work.
If you’ve decided to use a UMI for your resource (container app, web app etc) the client id - one of the properties of a user-assigned identity - has to be made accessible to the application code as an environment variable or configuration value as this is required in the credential setup. For example:
var clientID = Environment.GetEnvironmentVariable("Managed_Identity_Client_ID");
var credentialOptions = new DefaultAzureCredentialOptions
{
    ManagedIdentityClientId = clientID
};
var credential = new DefaultAzureCredential(credentialOptions);
Obviously Microsoft have huge amount of documentation on how all this is meant to work - review the guidance on using managed identities in your code.
For SMI, as long as you’re using the Azure.Identity packages correctly you don’t need to provide any additional configuration values.
Pipelines#
Ok pipelines! A quick primer in case you’re not familiar - pipelines help deliver code (aka features our customers can use) into our production environments. They do this by executing all sorts of tasks as defined in some YAML file, and if we follow that thread, executing something means some form of compute is required, such as a virtual machine.
These virtual machines are usually referred to as agents or runners - and they can be hosted for you, or you can create and host them yourself within your Azure tenant. Examples are GitHub-hosted and GitHub Self-hosted runners, along with Azure DevOps Microsoft-hosted agents and Azure DevOps Self-hosted agents.
Let’s get one thing out of the way first:
Hosted agents cannot use managed identities.
Only self-hosted agents whose virtual machine/container resources are running within the Azure eco-system can leverage SMI/UMI. So what does this leave us with?

As we’ve learned a service principal is an object within Entra ID which can be granted permissions, such as Contributor access over a subscription, so when the pipeline executes tasks they can perform actions. The way authentication happens varies depending on your CI/CD tooling, I’ll cover two I’m familiar with: GitHub Actions and Azure Pipelines.
Notable CI/CD differences#
There’s a few implementation differences when it comes to CI/CD authentication which will be useful for the examples that follow, read on!
Service connections#
Azure Pipelines use service connections which are:
“authenticated connections between Azure Pipelines and external or remote services that you use to execute tasks in a job.” - learn.microsoft.com
flowchart LR
  subgraph Azure DevOps
    P["Pipeline task"]
  end
  subgraph Azure DevOps
    SC["Service connection"]
  end
  subgraph Azure
    SP["Service Principal"]
  end

P -->|uses| SC
SC -->|which is
some kind of| SP
Service connections sit within an Azure DevOps Project and are used by tasks (such as AzureCLI) to perform authentication - they’re essentially an Azure Devops specific abstraction around the service principal which is doing all the real work. Any task which supports the use of a service connection will have a property called azureSubscription, connectedServiceName, or connectedServiceNameARM (there might be other aliases too) where you specify the name of the service connection to use.
The service connection name within Azure DevOps is what must be used on the task property; Service connections can be viewed from within an Azure DevOps project via Project settings -> Service connections.
Service connections can be powered by several variations of service principal - when creating the service connection you can specify whether it will use workload identity federation, user-assigned managed identity, or a secret to perform its authentication.
In contrast, GitHub Actions doesn’t have anything like the Azure DevOps service connection object - login tasks will directly reference service principal/identity details depending on the method you want to use.
Authentication - one vs many#
GitHub Actions can use the azure/login action to acquire an access token which is then stored locally on the agent; this task only needs to run once and then most subsequent steps in the workflow which need to interact with Azure can then use this token - though an example of an exception might be docker/login-action.
However, within Azure Pipelines, each task (which requires authentication) must be provided a service connection via a task property (such as azureSubscription) and each task performs a login and logout - the access token is not reused between tasks like in GitHub Actions.
AzureCLI behaviour#
The Azure Pipelines AzureCLI task executes using whichever version of Azure CLI software is installed on the agent.
The equivalent in GitHub Actions however is the azure/cli action which runs in a container with minimal software - which means you can specify the version if you don’t want to run latest (neat!). How is authentication working if it’s running inside a container I hear you ask? See for yourself - it’s mounting the .azure directory from the host which contains the access token.
Also within GitHub Actions, as long as the azure/login action has completed successfully you can execute arbitrary az commands, such as az account show, just using a run task. Attempting the same in Azure Pipelines will result in the message ERROR: Please run 'az login' to setup account because as we learned above, authentication occurs automatically when using a service connection enabled task and the script, bash, pwsh, and powershell etc steps do not use a service connection. To execute az commands in an authenticated session it’s better to use the AzureCLI or AzurePowerShell tasks.
Now that we’ve reviewed some of the differences, lets see a few examples of authentication with different identities.
Pipeline auth options summary#
Before we look at a few authentication examples let’s recap the options available to us when using executing tasks via CI/CD pipelines.
flowchart LR
  HA["Hosted agent"]
  SHA["Self-hosted agent"]
  SP["Service principal (OIDC or secret)"]
  SPUMI["Service principal (UMI)"]
  SMI["SMI (attached)"]
  UMI["UMI (attached)"]
  RG["Resource group / Subscription etc"]

  HA --> SP
  HA --> SPUMI
  SHA --> SP
  SHA --> SPUMI
  SHA --> SMI
  SHA --> UMI
  SP -->|RBAC| RG
  SPUMI -->|RBAC| RG
  SMI -->|RBAC| RG
  UMI -->|RBAC| RG
We’ve reviewed that pipelines execute tasks on hosted or self-hosted agents, and the authentication to Azure will use service principals or system and user-assigned identities. We know identities and service principals need to be granted RBAC permissions (authorisation) within Azure before they can create/modify/access resources and data.
Let’s check out some examples - expand each section for specific notes and an example task. For additional information you can always check the docs for connecting to Azure from GitHub Actions and creating Azure DevOps service connections.
GitHub Actions examples#
All of these examples use the azure/login action with varying properties.
Auth using SMI
- Only works with self-hosted agents
- System-assigned managed identity must be enabled on the agent (virtual machine/container) resource
- Secretless - issuing managed identity access tokens is handled automatically by the Azure platform
- Note the auth-type here is
IDENTITY
- name: Azure Login using SMI
  uses: azure/login@v3
  with:
    auth-type: IDENTITY
    tenant-id: ${{ secrets.AZURE_TENANT_ID }}
    subscription-id: ${{ secrets.AZURE_SUBSCRIPTION_ID }}
Auth using UMI
- Only works with self-hosted agents
- User-assigned managed identity must be attached to the agent (virtual machine/container) resource
- Secretless - issuing managed identity access tokens is handled automatically by the Azure platform
- AZURE_CLIENT_ID would be the
Client IDof theMicrosoft.ManagedIdentity/userAssignedIdentitiesresource - Note the auth-type here is
IDENTITY
- name: Azure login using UMI
  uses: azure/login@v3
  with:
    auth-type: IDENTITY
    client-id: ${{ secrets.AZURE_CLIENT_ID }}
    tenant-id: ${{ secrets.AZURE_TENANT_ID }}
    subscription-id: ${{ secrets.AZURE_SUBSCRIPTION_ID }}
Auth using service principal (UMI)
- Works with hosted and self-hosted agents
- Secretless - uses OIDC flow between Azure and GitHub
- AZURE_CLIENT_ID would be the
Client IDof theMicrosoft.ManagedIdentity/userAssignedIdentitiesresource - Note the auth-type here is
SERVICE_PRINCIPAL - Requires federated credentials to be configured on the UMI
- Does not require the UMI to be attached to the agent
- name: Azure login using Service Principal (UMI)
  uses: azure/login@v3
  with:
    auth-type: SERVICE_PRINCIPAL
    client-id: ${{ secrets.AZURE_CLIENT_ID }}
    tenant-id: ${{ secrets.AZURE_TENANT_ID }}
    subscription-id: ${{ secrets.AZURE_SUBSCRIPTION_ID }}
Auth using service principal (OIDC)
- Works with hosted and self-hosted agents
- Secretless - uses OIDC flow between Azure and GitHub
- Requires federated credentials to be configured on the service principal
- name: Azure login using Service Principal (OIDC)
  uses: azure/login@v3
  with:
    auth-type: SERVICE_PRINCIPAL
    client-id: ${{ secrets.AZURE_CLIENT_ID }}
    tenant-id: ${{ secrets.AZURE_TENANT_ID }}
    subscription-id: ${{ secrets.AZURE_SUBSCRIPTION_ID }}
Auth using service principal (secret)
- Works with hosted and self-hosted agents
- Not secretless
- Requires combining
clientSecret,subscriptionId,tenantId, andclientIdvalues into a GitHub secret - Generally not recommended
- name: Azure login using Service Principal (secret)
  uses: azure/login@v3
  with:
    creds: ${{ secrets.AZURE_CREDENTIALS }}
Azure Pipelines examples#
Auth using service connection
- Works with hosted and self-hosted agents
- Recommended way to ‘do authentication’ within Azure Pipelines unless you’re doing something bespoke
- Service connections can use various types of service principals to authenticate, this configuration is done when setting up the service connection not in the pipeline tasks
- Note the azureSubscription property is where the name of the service connection is specified
# Example 1
- task: AzureCLI@3
  displayName: 'Azure login'
  inputs:
    azureSubscription: 'SERVICE_CONNECTION_NAME'
    scriptType: 'pscore'
    scriptLocation: 'inlineScript'
    inlineScript: |
      # Executing az commands here will use the service connection's service principal

# Example 2
- task: AzurePowerShell@5
  inputs:
    azureSubscription: 'SERVICE_CONNECTION_NAME'
    ScriptType: 'InlineScript'
    azurePowerShellVersion: 'LatestVersion'
    pwsh: true
    Inline: |
      # Executing Az PowerShell commands here will use the service connection's service principal
Auth using SMI
- Only works with self-hosted agents
- The agent must have Azure CLI installed
- System-assigned managed identity must be enabled on the agent (virtual machine/container) resource
- Better suited for use with non-service connection tasks such as script, bash, pwsh, and powershell etc
- Will replace the access token if performed within an AzureCLI task
# Example 1
- task: PowerShell@2
  displayName: 'Azure login using SMI'
  inputs:
    targetType: 'inline'
    script: |
      az login --identity
      # Executing additional az commands here will use the SMI

# Example 2
- pwsh: |
    az login --identity
    # Executing additional az commands here will use the SMI

# Example 3
- bash: |
    az login --identity
    # Executing additional az commands here will use the SMI
Auth using UMI
- Only works with self-hosted agents
- The agent must have Azure CLI installed
- User-assigned managed identity must be attached to the agent (virtual machine/container) resource
- Better suited for use with non-service connection tasks such as script, bash, pwsh, and powershell etc
- Will replace the access token if performed within an AzureCLI task
# Example 1
- task: PowerShell@2
  displayName: 'Azure login using UMI'
  inputs:
    targetType: 'inline'
    script: |
      az login --client-id $(CLIENT_ID)
      # Executing additional az commands here will use the UMI

# Example 2
- pwsh: |
    az login --client-id $(CLIENT_ID)
    # Executing additional az commands here will use the UMI

# Example 3
- bash: |
    az login --client-id $(CLIENT_ID)
    # Executing additional az commands here will use the UMI
Auth using service principal (secret)
- Works with hosted and self-hosted agents
APP_IDrefers to theClient IDof the service principal (if viewing from App registrations portal blade) orApplication IDof the enterprise app (from within Enterprise applications blade)
# Example 1
- task: PowerShell@2
  displayName: 'Azure login using service principal (secret)'
  inputs:
    targetType: 'inline'
    script: |
      az login --service-principal --username APP_ID --password CLIENT_SECRET --tenant TENANT_ID
      # Executing additional az commands here will use the service principal

# Example 2
- pwsh: |
    az login --service-principal --username APP_ID --password CLIENT_SECRET --tenant TENANT_ID
    # Executing additional az commands here will use the service principal

# Example 3
- bash: |
    az login --service-principal --username APP_ID --password CLIENT_SECRET --tenant TENANT_ID
    # Executing additional az commands here will use the service principal
Service principal UMI#
You may have noticed something in the examples I haven’t explained - what’s the difference between these three:
- Azure login using UMI
- Azure login using Service Principal (OIDC)
- Azure login using Service Principal (UMI)
The first is creating a UMI, attaching it to the agent resource, operating as that identity in the pipeline. The second is creating a standard service principal and logging in with those details. Finally the third one is creating a UMI resource (which don’t forget, is still a service principal) and logging in with those details.
Ignoring the first one for now, the second option only gives you an access token that’s valid for 60 minutes; perfectly fine for most pipeline jobs but what happens if you go beyond an hour? Tasks will fail with AADSTS700024: Client assertion is not within its valid time range.
Using a UMI as the service principal will issue a token that is valid for 24 hours which gives long-running jobs the extra time to complete - a real example I’ve seen is automated database restores failing because they need a few hours to complete.
This is called out directly in the azure/login readme:
By default, Azure access tokens issued during OIDC based login could have limited validity. Azure access token issued by Service Principal is expected to have an expiration of 1 hour by default. And with Managed Identities, it would be 24 hours. This expiration time is further configurable in Azure. Refer to access-token lifetime for more details. source
Option 1 will also grant an access token which is valid for 24 hours, but as I’ll mention later in Can I vs should I? it’s generally not something you’d want to use.
Warnings about device code flow#
Although we said pipelines use service principals, if you really wanted to you can drop in a bash/powershell task that runs az login and attempt authentication via what’s called the device code flow. When you need to authenticate a device which isn’t interactive/doesn’t have a console, you can use this method and it should prompt you with a message like this:
To sign in, use a web browser to open the page https://login.microsoft.com/device and enter the code CXXC89YY1 to authenticate.
Opening this link and performing the actions will authenticate the device as your user. Within the context of running pipelines this is an act so heretical you may be cast back to the support desk if discovered, so between that and the fact Microsoft recommends blocking device code flow wherever possible you generally don’t want to do this - it’s just interesting that one could.
Can I vs should I?#
We’ve reviewed a lot of options on what’s possible, but that doesn’t mean every method is equally appropriate. The industry has been moving away from static secrets for a long time, using federated/OIDC authentication has never been easier so honestly:
- For Azure Pipelines, use service connections which are Workload Identity Federation service principals
- For GitHub actions, use service principals which have been configured with OIDC
[NOTE]
If your pipeline jobs are running for over an hour you may need to switch to the user-assigned managed identity service principals grant access tokens with a ~24hr validity as mentioned in Service principal UMI.
If you have some specific requirements where it makes sense to leverage SMI/UMI of your agents then by all means, but in a busy organisation delivering lots of things via CI/CD, creating per workload service principals that have the specific access they need will generally serve you much better rather than having one deployment principal to rule them all.
A final weird thing#
Now that we know all the things I want to pose a hypothetical little scenario, although something similar to this did come up for me a few years ago. Scenario:
- Pipeline running on a self-hosted agent with SMI enabled
- Pipeline has authenticated to Azure using a service principal
- Task executes an application to apply some database schema changes which is configured with a
ChainedCredentialTokenthat includes theVisualStudioCredential,ManagedIdentityCredential, andAzureCliCredentialcredentials - Only the service principal has been given access to the database
What happens? Have a think before reading on.
Up in the applications section it was highlighted that chained tokens would attempt each credential in order until a token was successfully obtained. The ordering in this scenario puts ManagedIdentityCredential before the AzureCliCredential so when it attempts to retrieve a token, because SMI is enabled for the agent it is successful - it doesn’t matter whether that token has the right access to the database, only that it was obtained.
The application attempts to update the database schema with an access token which isn’t granted the correct authorisation on the database and the step fails. To correct this we can turn of the SMI for the agent, and/or alter the chained token to place AzureCliCredential before ManagedIdentityCredential, or even remove it altogether if it’s not appropriate.
The issue I encountered years ago was likely because we were moving away from using agent identities towards service principals and we had a mini perfect storm which was confusing until we reviewed all the pieces.
Wrapping up#
Congrats on making it this far, we’ve certainly covered a lot of ground.
Hopefully we’ve reached an understanding that standard passwords kind of suck and we should avoid them wherever possible; they’re long-lived, unwieldy to manage, and a prime target for malicious actors. Using managed identities within the Azure eco-system is an improvement in almost every way and is supported by many Azure services and resource types.
We covered authentication (AuthN) and authorisation (AuthZ) and how they are different pieces, authentication proving who you are and authorisation setting what actions can be taken.
We’ve learned that Azure managed identities broadly come in two flavours, the system-assigned and user-assigned; where the system identity is tied to the life-cycle of a specific resource (delete the resource, delete the identity), and the user identity exists independently, something which can be attached to one or more resources as required.
We established your Entra user account can be granted permissions in Azure and when you’re browsing via the Azure portal or connecting with az login locally, that’s your identity. We also saw that Azure resources get an ‘account’ of their own too if they are enabled/assigned a managed identity, which allows them to access other Azure services.
We’ve reviewed how applications can authenticate to Azure services using various token credentials and how the behaviour can differ whether it’s running local or within Azure on a resources which supports managed identity.
And lastly we learned SO MUCH about how pipelines can authenticate using identities or service principals and some of the implementation differences between Azure DevOps and GitHub.
I hope this has been interesting and/or helpful, and until next time, stay curious.